Category Archives: Southern

Andouille Sausage

I spent the holiday season at my parents’ home cooking up a storm! Who could not be motivated to throw down in the kitchen when you’re surrounded by eager taste testers, fellow culinary enthusiasts, and quality ingredients!

It has been one of my recent goals to develop a great recipe for andouille sausage. For those of you not familiar with andouille, it is a coarse-textured pork sausage with a medium fat content. Its flavor profile comes from a lot of fresh garlic, paprika, and slow smoking. I remember spending a few summers during high school and college with my grandmother in rural Louisiana and having the best, freshly smoked andouille sausage from the mom-and-pop smokehouse in town. The quality and flavor was superior to any commercial andouille sausage sold at the local grocery store. So much so that each summer, I would stock up and pack 20 pounds of smoked tasso and andouille in my carry on suitcase to take back home!! (No lie)

Lucky for me, my dad’s a semi-pro at sausage making – he’s been making the best boudin in the world (totally unbiased!) for as long as I can remember. So he and I took a trip to the meat monger, pulled out the meat grinder, and got to work in the kitchen. The final product was delicious and reminded us of the andouille from the mom-and-pop smokehouse. If you’ve got the equipment, time, and are up for a culinary adventure, please try our recipe! If not, well… if you’re family or a friend, at least you know who to call for some amazing andouille! 🙂

TIP!: This recipe is for medium spice/heat level andouille. For hot/spicy andouille, double the amount of cayenne pepper. Keep in mind that if your sausage is hot, every dish you use it in will be hot as well.

TIP!: It’s always important to taste your sausage mixture after seasoning because you cannot adjust the seasoning after it’s stuffed and cured. Make a test patty after you season your meat, cook the patty thoroughly in a frying pan, and taste! Adjust your seasoning, if necessary.

Andouille Sausage

Andouille smoking....

Andouille smoking….

image-10

Juicy!

Seasoning Mixture – Per pound of meat mixture

Cure Note: The addition of nitrate cure salt is crucial for any sausage that is dried or smoked at low temperatures (40°F – 140°F). Nitrates prevent the growth of microorganisms, particularly Clostridium botullinum – the cause of botulism. This microbe forms spores that grow well in low-oxygen environments and at temperatures of 40°F – 140°F, which is the type of environment created when smoking meat at low temperatures. There is controversy regarding the health risks and benefits of nitrates in cured meats and I suggest that you read up on both points of view before curing any meats.

  • 2 tbs. minced, fresh garlic
  • 1 tsp. paprika
  • 1 tsp. black pepper
  • 3/4 tsp. kosher or sea salt
  • 1/2 tsp. dried thyme
  • 1/4 tsp. cayenne
  • 1/5 tsp. instacure #1 (it’s 1 tsp. per 5 lbs. of meat, so estimate if you’re making less than 5 lbs.)
  • 2 tbs. water

Mix all of your seasonings and herbs together with water to create a paste. Leave minced garlic as is.

image-4

Seasoning paste

Meat Mixture

  • 3 parts of lean pork butt or pork shoulder – skin removed
  • 1 part of pork fat (ask your butcher for fat trimmings)

Sausage Casings Note: I greatly prefer natural hog casings to synthetic casings. They have a much better bite after cooking your sausage. This was the first time I used pre-tubbed casings, which are more expensive but they do not need to be cleaned as you would natural hog casings. I would recommend the pre-tubbed casings for this reason – if you’ve ever cleaned natural hog casings or chitterlings, then you’d understand!

image-2

A lot of fresh garlic!

Sausage Making:

image-12

1/4 inch cubed pork to add texture

image

My dad mixing in the seasonings and garlic by hand

  1. Use a meat grinder with the coarsest blade/plate and grind all the fat and 2/3 of your pork butt or shoulder. Your meat and fat should be very cold to assist the grinding process and keep your product coarse.
  2. Freeze the remaining third of the pork for at least 1 hour. Freezing your meat will make it easier to cut. Cut the meat into 1/4 inch to 1 centimeter cubes, and add to your ground meat.
  3. Add the seasoning paste and minced garlic to your meat mixture and mix well with your hands.
  4. Load your casings on your sausage stuffer and get to stuffing!! If using an electric dual grinder and stuffer (as we used, below), remove any grinding blades/plates before securing your stuffer nozzle to prevent further grinding of your meat. Make links as long or as short as you wish.
  5. Place the sausage in a loosely covered pan in the fridge overnight (12 – 18 hours) to cure.
image-7

Sausage stuffing using natural hog casings

Sausage Smoking:

The smoker. The sausage is in chamber on the left, and the smoke is generated in the chamber on the right.

The smoker. The sausage is in chamber on the left, and the smoke is generated in the small chamber on the right.

You want to smoke your sausage at the lowest temperature possible, given your smoker apparatus. We smoked ours at 120-140°F for 2.5 hours, then raised the temperature to 200°F for 1 hour or until the internal temperature of the sausage read 152°F.  We used mesquite briquettes but you can use another kind of wood, if you prefer. To achieve the temperature variation, we simply added additional hot coals to the wood briquettes to increase the temperature. You can also try decreasing the distance between your coals and sausage to increase the temperature, or adjust any vents on your smoker. The most important part about the smoking step is to keep the temperature low. If the temperature is too high, your sausage will cook before it has finished smoking, which will affect the flavor profile (although your sausage will still be super yummy!).

image-1

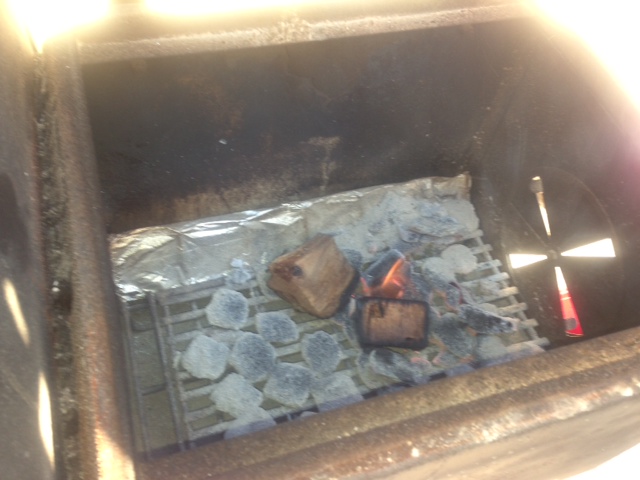
The smoker set up – the smoke chamber. Coals were added, removed, or repositioned to adjust the temperature of the the smoke.

Once your sausage is smoked, it is fully cooked and can be stored in your fridge for up to 3 weeks (the cure is a preservative) or for 6 months in the freezer. But honestly, this sausage is so good it probably won’t linger in the fridge for more than 2 days!

image-9

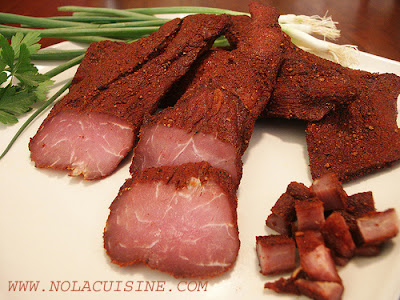
Sliced andouille. Notice the nice marbling of fat and chunks of garlic.

TIP!: If you don’t have the sausage making equipment or a smoker, this recipe makes a very tasty fresh sausage. You can use the seasoning mixture as is (minus the addition of instacure if you’re not smoking your meat) with course ground pork obtained from your trusted butcher. Super easy and tasty!

Collard Greens

Collard greens, the ubiquitous soul food staple! The dish has been used in soulful songs, even stating that good love is better than your grandma’s collard greens. That’s a bold statement. I don’t know about you, but very few things are better than my grandma’s cooking… But that’s not to take away from the soul warming effects of GOOD collard greens (and cornbread, of course).

Dark greens, like collards, are rich in vitamins and minerals. Calorie for calorie, they are the most nutrient rich group of foods. They are also high in antioxidants, which reduce oxidative stress on your cells (associated with causing many diseases such as type 2 diabetes, heart disease, and neurodegenerative diseases).

So basically, eat more collards!!! (and other dark, leafy greens)

Collards are most nutritious during the cold-months, making the fall and winter a perfect time for some yummy collard greens. I’ve been cooking them for over 10 years so my recipe has been tweaked a few times to come up with the best end product: tender collard greens in a rich and flavorful broth.

TIPS:

1. I prefer to use smoked ham hocks to flavor my broth but if you don’t eat pork, smoked turkey wings or necks will work well too. I haven’t quite figured out a good vegetarian/vegan recipe for collard greens, but if anyone has some tips, share below.

2. I only soak my greens for 10 minutes in cold water. I know some people soak their greens as long as over night to remove any bitter flavor. However, through trial and error, I have found that the extra soaking time isn’t necessary. 10 minutes will do and your collards won’t be bitter.

3. You can start your greens on the stove top, then move them to a crock pot on low to allow them to slowly cook overnight. Make sure that before you go to sleep, the greens are covered with liquid and the lid is on well. Your home will smell amazing when you wake up too!

4. I normally use store bought chicken stock for the sake of time. However, using homemade chicken stock does add more flavor.

5. Collard greens freeze really well. So make the full recipe, even if it’s just dinner for 2, and freeze the rest.

6. Go light on the seasoning early in cooking your greens. Your broth will reduce and concentrate quite a bit so you can add more salt towards the end of cooking, if necessary.

What tips do you have for making your favorite dark, leafy greens? Comment below to share your tips. Enjoy!

Collard Greens

  • 1 tbs. olive oil
  • 2 smoked ham hocks
  • 1 large yellow onion, roughly chopped
  • 6 cloves of garlic, crushed
  • 1 quart of chicken stock
  • 1 quart of water
  • 6 bunches of collard greens (~6 lbs.)
  • Salt & black pepper

1. In a large pot, add your oil and brown your ham hocks over medium-high heat. Browning will add more flavor to your broth.

2. Add onions and garlic to pot. Season with salt & pepper. Sauté to brown onions and garlic.

3. Add chicken stock and water. Bring to a boil, then turn reduce heat and simmer for 20 minutes.

4. Clean, chop, and soak your greens while the stock is simmering. Remove bottom stalks of the leaves and chop into 1 inch squared pieces. Fill your sink with cold water, add your chopped collard greens, and soak for 10 minutes.

5. Remove the collard greens from the sink, place them in a colander, and give them a good rinse, then drain. Collard greens are super dirty, so this step ensures no sand will be in your final product. You may need to do this in batches.

6. Add your greens to your stock in batches of 3. Its seems like way too much greens for the size of your pot, but trust me, everything will fit.

7. Season your greens with salt and pepper. Simmer at medium-low heat for 2.5 hours. Check water level and seasoning every 30 minutes or so and stir.

8. Use a fork to remove the ham hock meat from the bone and shred. Mix with your collard greens and serve with corn bread.

Serves: 6 – 10 (depending on serving size)

Ooey Gooey Bread Pudding with Apple Caramel!

I love bread pudding. Let me rephrase that I love moist, flavorful, and buttery bread pudding! You would be surprised to know how difficult it is to find such bread pudding.

However, if you’re in Portland, OR and want to get your bread pudding fix, I highly recommend Cafe Castagna. Their bread pudding has all the qualities I crave and more! The custard is simply flavored with vanilla and nothing more. No raisins, cinnamon, or nutmeg. The top is delicately brûleéd to a medium golden brown. Mmmmmm…

My bread pudding is actually very different from Cafe Castagna’s version. I added spices and flavors which complement the fall and holiday season. So, try my recipe out for your favorite fall or winter holiday and be sure to let me know how it turned out!

Bread Pudding with Apple Caramel

Bread Pudding:

  • 4 cups challah or brioche bread (available at Whole Foods or Trader Joe’s)
  • 2 cups heavy whipping cream, reserve 2 tbs. for later
  • 1 tbs. ground cinnamon
  • 8 egg yolks
  • 1/2 cup light brown sugar
  • A pinch of salt
  • 2 tsp. pure vanilla extract
  • Baking dish: 4 – 8 oz. ramekins/oven-safe bake ware

1. Cut your challah or brioche bread into cubes approximate 1 cm square. Arrange cubed bread on a cookie sheet and allow cubes to dry at room temperature for at least 1 hour – 24 hours. The longer your bread dries, the more custard it will be able to soak up.

2. To make the custard, set up a double boiler. Place a heat safe glass bowl over a pot of simmering water so that the water level does not touch the bottom of the bowl (you want about 2 inches of water in your pot).

3. Add the heavy cream (minus 2 tbs., for later) and cinnamon to your double boiler to heat the cream. Cinnamon is not water soluble so you may need to use a whisk to prevent your cinnamon from clumping in the cream. Heat the cream for about 10 minutes, or until it begins to steam and it is hot to the touch.

4. In a separate bowl, whisk together your egg yolks, brown sugar, and salt until combined.

5. Temper your egg yolk mixture with your hot cream. Use a ladle or measuring cup to slowly add half of your hot cream to your egg yolks, whisking frequently. You must do this slowly while whisking to prevent your egg yolks from curdling.

6. Cook your custard. Add your cream and egg yolk mixture back to your double boiler. Cook your custard for about 15 minutes while stirring – again to prevent curdling – or until it is thick enough to coat the back of a spoon. Remove from heat and add the vanilla extract and mix well. KEEP YOUR BOILING WATER!

7. Fill your ramekins with the cubed bread first and then fill each up to the top with custard. You can gently press down on the bread cubes with a spoon to make sure they are all able to soak up the custard.

8. Allow your bread pudding to sit for about 5 minutes. Bake your bread pudding in a water bath (aka a bain-maire) for 20 – 25 minutes at 350F or until nicely golden brown. Use the boiling water from your double boiler and add 1 1/2 inches of water to a deep baking or roasting pan that will accommodate your ramekins.

Apple Caramel:

You can make this while your bread pudding is baking!

  • 1 1/2 cups apple cider, I recommend Trader Joe’s
  • 1 tsp. cinnamon
  • 2 tbs. heavy whipping cream

1. In a small pot, bring your apple cider with cinnamon to a boil and reduce in volume until you have approximately 1/4 cup left. This should take about 15 minutes. You can use a cold spoon to test if your caramel is ready.

2. Dip the cold spoon into the reduction, if the liquid becomes firm, then it is ready. Remove from heat, add your whipping cream, and mix well. Allow the caramel to cool to room temperature. If it becomes too thick, you can add water (a teaspoon at a time) to thin the caramel out.

To Serve: Drizzle your apple caramel sauce on top of your bread pudding and serve warm! Your bread pudding should last for up to 3 days, well covered in the refrigerator. The caramel should last for up to 1 month if stored in a sealed container in the refrigerator.